PuTTY is a simple, easy to use SSH client for Windows. The purpose of this document is to describe specifically how to use PuTTY to access Lemuria. This document includes both basic information for the first time PuTTY user and more advanced information such as how to set up public/private key authentication.
PuTTY's main advantage over other SSH clients is that it is a very small program that can be stored pretty much anywhere. Thus, you can put it in your home directory on the Windows file server and have access to it from every lab on campus. You can also copy PuTTY to a flash drive and use it without necessarily copying it to any particular machine.
PuTTY is also fairly easy to configure and use. Although it lacks some features available in advanced terminal emulators, you should find PuTTY quite adequate for ordinary, day-to-day use.
You can download PuTTY from the PuTTY home page. PuTTY comes with some optional tools that are not necessary for accessing a terminal session, but you may find them useful later. The Windows MSI installer contains PuTTY and all the optional tools. You can also download individual executable files from the downloads page.
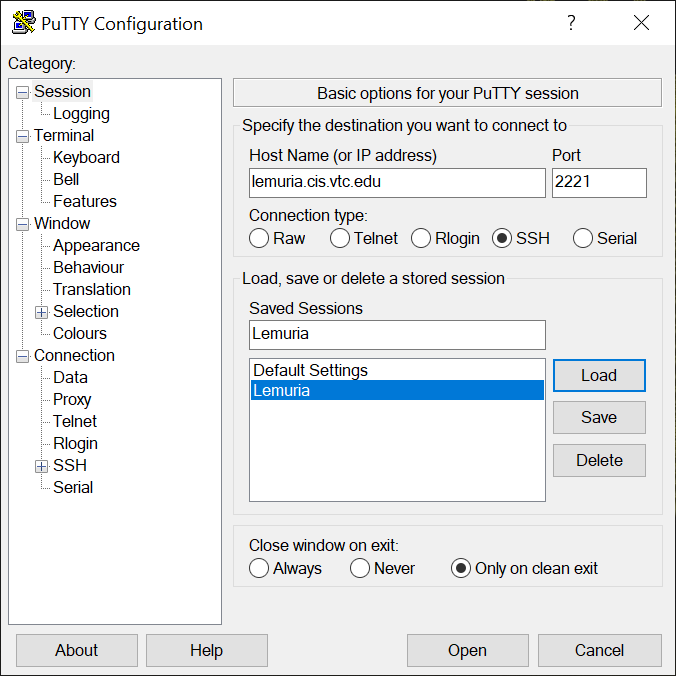
After you have installed PuTTY, double-click on the PuTTY icon (or run PuTTY.exe). You will see a dialog box where you can define one or more sessions. You could have several sessions defined for various Linux hosts, or even several sessions for the same host using different settings. Initially the "Saved Sessions" box will be empty. Fill out the dialog as shown below for a "Lemuria" session:
Be sure you spell the hostname and port correctly. This defines the server to which you want to connect. Also be sure "SSH" is selected. Fill in any session name you like. The example above uses "Lemuria." Then press "Save" to save that session for later use. You can optionally change other characteristics of the session by navigating among the various configuration dialogs using the Category list on the left side. If you do change any other session settings, don't forget to re-save the session (if you want your changes to be preserved).
You can now either double click on the name of the saved session or click on the "Open" button to start the currently loaded session.
When you first connect to Lemuria, or any other new host, PuTTY will present you with a dialog box asking about the "host key" of that system.
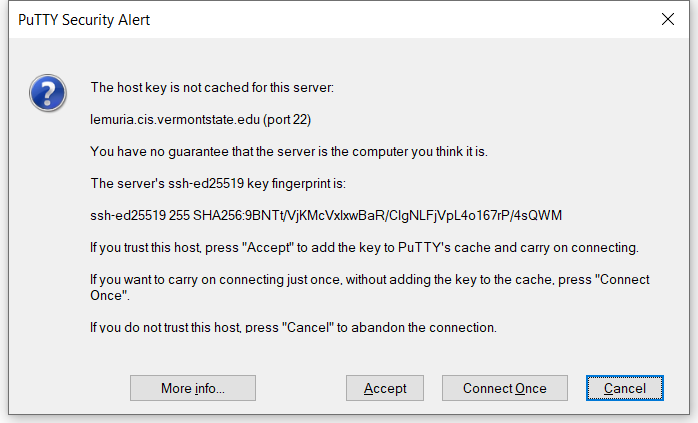
The SSH protocol verifies that the host you are connected to is the one you expect. In theory, hackers might be deflecting your connection to a malicious computer posing as your intended host. They could then steal your password for that host or cause you other problems. Such attacks are fairly rare, and especially against an inconsequential machine like Lemuria. However, to be formally correct, you should now verify that the host key presented to you by PuTTY is, in fact, the correct one. The example above shows Lemuria's true host key. Feel free to compare what PuTTY shows you against what is shown above. If they agree, you can click on "Yes" to have PuTTY store that host key in your computer's registry. When you connect to Lemuria in the future, PuTTY will check the host key against the stored copy and not bother you again unless there is a discrepancy.
Since spoofing attacks against Lemuria are exceedingly rare (it has never happened, to my knowledge), it would be reasonable to just accept the host key on faith (by clicking "Yes") and move on. You will quickly realize if you are not connected to the right machine. Should the host key change in the future due to a later attack, PuTTY will notice the change and alert you as it should.
Be aware that when you are prompted for your password after you connect, the password is not displayed in any way. Not even dots are displayed. This might lead you to believe that nothing is working. However, PuTTY should still be accepting your password. Once you press "enter" the password will be sent to Lemuria and you will be logged in.
When you are done with your session on Lemuria, type the exit command to log out (the '$' below is the prompt on Lemuria; do not type that, it is shown only for context):
$ exit
You might be tempted to just close the PuTTY window to log out. If you try that PuTTY will warn you with a message that says, "Are you sure you want to close this session?" Abruptly closing the session in this way isn't bad, but it is "unclean" in the sense that you never told Lemuria that you want to log out. In practice, this isn't a problem because by closing the network connection, PuTTY indirectly informs Lemuria that you are gone. Nevertheless, I recommend formally logging out using the exit command before closing the PuTTY window. Properly backing out of what you are doing is sometimes as important as properly starting something. It's a good habit to cultivate.
If you have SSH access to a remote system, you can use SSH to forward connections from the remote system to your local system. This is a feature of the SSH protocol called "port forwarding" or "tunneling."
For example, Lemuria is behind the VTSU firewall; only the SSH port (we are using 2221) and the HTTP port (80) are externally available. Any other service on Lemuria, such as the PostgreSQL database server, is not directly accessible. In fact, Lemuria has a host-based firewall that prevents some services from being accessible even from inside the VTSU network. This posture, where even internal users are not automatically trusted, is called "zero trust."
You can configure PuTTY to open a port of your choice on your own machine, and then forward all traffic to/from that port to a connection made by the remote SSH server. That traffic is said to "tunnel" over your SSH connection.
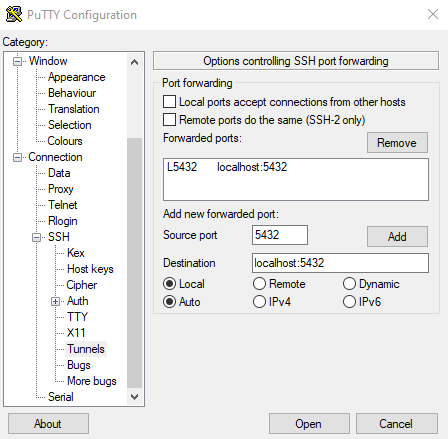
The image below shows PuTTY's tunnel configuration dialog. Drill down through the Connection... SSH... Tunnels items on the left side of PuTTY's configuration dialog. On the right side fill in the following fields:
Source Port: This is the port on your machine to which your local software will connect. It is common to use the same port number as is standard for whatever service you are using. For example, the PostegreSQL sever normally listens to port 5432 so that is a reasonable choice here. However, if you are running a PostgreSQL server locally that is already listening to that port on your system, you will have to choose another port.
Destination: This the hostname:port to which you want the far end of the tunnel to connect. The far end of the tunnel is where the SSH server is located, behind the firewall. Note that the hostname is relative to the server side of the tunnel. Thus "localhost" here means "local to the server."
Be sure the "Local" and "Auto" radio buttons are selected. This pertains the mode in which the tunnel is created.
It is important to click on the "Add" button to add the tunnel configuration to the "Forwarded ports" box. It is possible to define multiple forwarded ports at once; they will all be listed in the forwarded ports box. You may also want to save the overall PuTTY configuration for later use. Scroll the left side of the configuration dialog to the top and select Session, then click the Save button on the right side of the dialog to save the settings.
To use the tunnel, first log into the remote host using PuTTY. This PuTTY connection needs to remain open as long as you need the tunnel. When you log out from the remote host, the tunnel is shut down.
You are able to use your logged in PuTTY session normally even while the tunnel is being used. Traffic over the tunnel is multiplexed with your terminal session, meaning it is isolated from the terminal traffic. However, in some cases you will only need to log into PuTTY to create the tunnel without any intention of interacting with the remote system via the terminal. That is normal.
Finally, using whatever other software on your machine is appropriate, configure that software to connect to the source port you defined on your machine. For example, if you configure that software to connect to port 5432 on localhost, that software will communicate with the remote PostgreSQL server (in this example) via the tunnel. It is as if the remote server is on your system, even though it is not.
Some software can create SSH tunnels on their own without the help of an external SSH client like PuTTY. Using PuTTY to create an SSH tunnel should be a last resort. For example, the DBeaver database management tool has an "SSH" tab in its connection dialog box where you can configure tunnel parameters. DBeaver can then connect to the remote database via an SSH tunnel without the help of PuTTY or any other SSH client. This is convenient, but unfortunately, not always an option.
To simplify the installation of PuTTY, we have prepared a custom archive that contains PuTTY, the PuTTY tools, and several files containing configuration information for the VTC network. Download the custom archive and store it on your M: drive. In addition, download the custom setup program and also store it our your M: drive.
Navigate to the M: drive using Explorer and double click on PuTTY-Setup.bat. Follow the instructions. Once the installation is complete you can delete the two files you downloaded: PuTTY-VTC.zip, and PuTTY-Setup.bat
The setup program creates a folder named PuTTY on your M: drive and stores a number of files in that folder. These files include
The files above are part of the normal PuTTY distribution. However, you will also find a few additional files that we have added.
When your account on lemuria was created, the system administrator generated a public/private key pair for you and assigned a pass phrase to the private key (the private key is encrypted with the pass phrase). The administrator then installed the public key in your home directory on the Linux host and distributed the private key (in a file) to you. Specifically you should have received the following information from the lemuria administrator:
The file id_dsa containing your private key encrypted with a pass phrase.
The pass phrase for the file above.
The file id_dsa.pub containing the corresponding public key. You do not need to use this to access lemuria, but you might find it useful if you want to set up public/private key authentication with some other Linux host.
Store all the files you received on your Windows server home directory in the M:\PuTTY folder. Then do the following:
Using Explorer, navigate to M:\PuTTY and double click onPUTTYGEN. This is a key management tool for PuTTY.
Select 'Conversions|Import key' from the menu. In the file selection dialog box that appears, select id_dsa and load that file into PUTTYGEN. You will be prompted for the passphrase.
Erase the 'Key comment' text entry field (it should initially say "imported-openssh-key") and replace it with a comment that is more appropriate. We suggest "Lemuria access key." This comment will be used by PuTTY to identify which key it is using.
Erase the 'Key passphrase' and 'Confirm passphrase' text entry fields and replace them with a passphrase of your choosing. You should choose a relatively long passphrase consisting of multiple words, maybe with some words spelled incorrectly. Also include some punctuation marks, perhaps in strange locations. The pass phrase should be an easy to remember nonsense sentence. Do not forget your passphrase!.
Click on 'Save private key.' Specify the name of the output file as id_dsa.ppk.
You only need to execute the steps above once. They convert the private key file you were given from OpenSSH format to PuTTY format. Once the file has been converted it won't need to be converted again unless you change your keys.
Before you can use PuTTY on a particular machine, you need to configure your Windows account on that machine. To do this, navigate to M:\PuTTY and double click on Client-Setup.bat. Follow any instructions that appear.
To use PuTTY to connect to lemuria, navigate to M:\PuTTY and double click on PUTTY.EXE. In the dialog box that appears double click on the saved session named "lemuria." You will be asked for your username on lemuria. You will then be asked for the pass phrase for your private key. After entering this information, you should be logged into lemuria normally.
Using public/private key authentication with SSH seems very annoying. Why bother? There are several excellent reasons.
The SSH protocol encrypts all information between your client and the server, preventing that information from being observed on the network by an attacker with network sniffing tools.
An attacker must gain access to both your private key file and know your pass phrase to log into your account. If the attacker is missing either of those components your account can't be compromised. Thus, a straight forward attempt to guess your password can not succeed no matter how many times the attacker guesses.
The SSH server can be run in a higher security mode where it rejects all connections using simple password authentication. This protects the server from a certain class of common attacks (in particular: brute force attempts to find a username/password pair that will successfully log in).
Using the SSH agent system (described below), you can arrange things so that you don't need to enter your pass phrase to access your accounts. This is very handy.
If you will be using one particular machine for a long time (for example your personal machine), you may find it handy to run the SSH Agent program on that machine. This program holds your private key and makes it available to PuTTY on demand. Thus, once the agent is running you no longer have to enter your pass phrase to gain access to the remote system.
Navigate to M:\PuTTY and double click on PAGENT.EXE to start the agent. Look for the program as an icon of a computer wearing a hat in the system tray in the lower right corner of your screen.
Right-click on the agent icon and select 'Add key' from the pop-up menu. Browse to M:\PuTTY\id_dsa.ppk in the file selection dialog box that appears and load that file into the agent. You will be asked for the pass phrase.
Now when you connect to a host with PuTTY, you only need to provide your username on the host. PuTTY will pick up the private key that it needs from the agent.
If you want to change the configuration of PuTTY you can do so in the initial configuration dialog box. First select the saved session you want to change and click 'Load.' Make whatever changes you want, and then click 'Save' to write those new changes into your registry.
Click on the 'Start' menu on your Windows system and select 'Run.' In the dialog box that appears, enter 'regedit' (no quotes) and click on 'OK' to run the registry editor.
Open the registry key HKEY_CURRENT_USER\Software\Simon Tatham\PuTTY\Sessions. Right-click on the session you want to update and select 'Export' from the pop-up menu that appears.
Browse to the appropriate *.reg file and overwrite it with the new configuration information.
If you want to use public/private key authentication you can simply copy the id_dsa.pub file to the remote Linux system and append it to the file ~/.ssh/authorized_keys. If the authorized_keys file does not exist, just rename id_dsa.pub to authorized_keys. Next, create a new PuTTY session for the additional Linux host, making sure to specify your private key file, M:\PuTTY\id_dsa.ppk, as the authentication key.
That's it!
If you want to transfer files from your Windows system to lemuria, you can do so using PuTTY's secure FTP program.
Navigate to M:\PuTTY and double click on the PSFTP.EXE program.
In the console that appears, type open lemuria.cis.vtc.edu to specify the name of the host to which you want to connect. Problem: SFTP.EXE does not appear to use PuTTY's saved sessions and hence doesn't know about the location of the private key file.
You can now use conventional FTP commands to put and get files from lemuria. The files will be transferred to/from M:\PuTTY by default.
Last Revised: 2023-01-11
© Copyright 2023 by Peter Chapin
<pchapin@vtc.edu>